Home
A key to conquer the (open source) world.

Main navigation

  • Home
  • About Us
    • About this website
    • About_me
    • Family rivalry
  • Gurus
  • Tutorials
User account menu
  • Log in

Breadcrumb

  1. Home

Reduce PNG File Size By 70% Without Losing Much Quality using GIMP.

Hero image for keyhole tutorials.

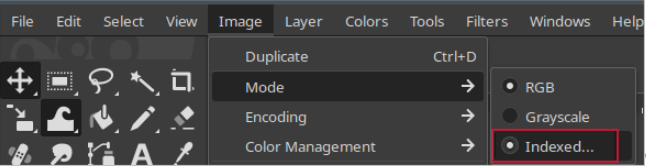
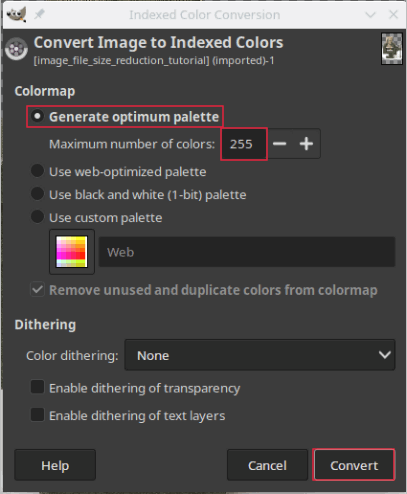
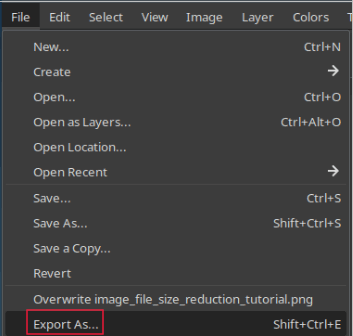
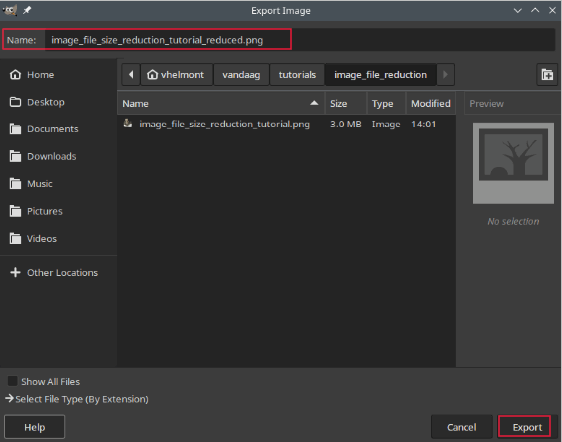
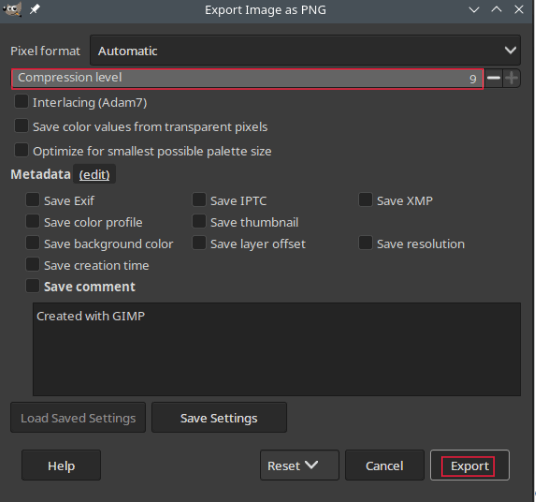
Why Reduce File Size?

If you've ever built a website with the goal of ranking well on Google, you likely know that site speed matters—a lot. Large image files can significantly slow down load times. As designers, we often prioritize clarity and resolution, sometimes at the expense of file size. But on the web, that trade-off can hurt performance.

Another common reason to compress PNGs is file size restrictions on upload platforms.

Image file size reduction.

Benefits

  • Compressing PNG images without losing quality offers significant SEO benefits by improving website speed and performance.

  • PNG is ideal for images requiring transparency, sharp edges, and text, but typically has larger file sizes than JPEGs.

  • Lossless compression ensures PNG quality and transparency are preserved while reducing file size.

  • Tools like image editing software (GIMP) can help compress PNGs without compromising quality.

Open source tools.

There are plenty of free, open-source tools available to shrink PNG file sizes without sacrificing much image quality. If you’re using graphics programs like Inkscape or GIMP, they can help streamline your workflow by handling compression directly. For example, GIMP offers options to reduce file size during export.

Using GIMP To Reduce PNG File Size

Open the image using Gimp

After opening the image using Gimp, go to Image > Mode and select Indexed.…

Select Indexed mode.

This will open the Indexed Color Conversion menu.

Adjust the Indexed Color Conversion menu.

The Indexed Color Conversion menu.

By default, “Generate optimum palette” will be selected and the maximum number of colors should be set to 255. Leave those values just as they are (or set those values if GIMP didn’t default to them) and click Convert.

Export your image as a PNG file

Go ahead and export your image as a PNG file by clicking Export As...

Export image as a PNG file.

Change the filename into the Name field in order to compare the file sizes when finished.

Change the filename.

After clicking the Export button, you’ll be prompted with the following export menu.

Adjust settings in the Export Image as PNG form.

Adjust the export settings.
  • Compression level: Adjust the compression level to control the amount of compression. A higher value (e.g., 9) results in minimal compression with no quality loss. Lower values (e.g., 1) apply more compression, reducing file size but potentially affecting image quality.

  • Interlacing: You can choose Adam7 for interlacing. Interlacing makes the image display more smoothly during loading but might increase the file size slightly.

  • Save background color: Make sure this option is unchecked to preserve transparency in the image.

  • Save IPTC data: IPTC data is metadata that contains information about the image, such as the photographer, copyright, description and keywords. Make sure it’s disabled if you don’t need it to further reduce PNG size.

Make sure you have unchecked absolutely everything listed in the entire menu. This is all useless information that needlessly takes up disk space. Don’t worry about preserving thumbnail or timestamp data. This information is automatically captured by your operating system anyway.

After disabling everything, go ahead and click the Export button. Compare the file size of the original and the reduced image.

Conclusion

Stripping down the image’s colors to just 255 reduced the PNG file size dramatically. As for quality loss, the reduced image is slightly more pixelated than it originally was, but unfortunately this is the compromise to be made when creating graphics for the web.

If a site must load quickly for users with slower internet speeds — preventing them from bouncing from the page — the site must load in a reasonable amount of time. There’s a variety of factors that impact this, but image file size is a factor that certainly should not be ignored.


Categories
Gimp
Thu, 08/14/2025 - 13:56

Managed ad1

RSS feed
Powered by Drupal